注釈の保存
これまでの作業によって、注釈を作成できるようになりました。ここでは、simple-storage モジュールを使用して、作成した注釈を保存する機能を追加します。このセクションでは、永続的ストレージに関する以下の 3 つのトピックについて説明します。
simple-storageを使用したオブジェクトの永続化- 割り当てられたストレージクオータを超過した場合の処理
- プライベートブラウジングへの配慮
新しい注釈の保存
このセクションでは、main.js ファイルのみを扱います。
まず、以下のような宣言を行って simple-storage モジュールをインポートします。
var simpleStorage = require('simple-storage');
このモジュールのスコープで、保存された注釈を格納する配列を初期化します。
if (!simpleStorage.storage.annotations)
  simpleStorage.storage.annotations = [];
ここで、新しい注釈を処理する関数をモジュールのスコープに追加します。注釈は、ユーザーが入力したテキストに加え、URL、要素 ID、および要素コンテンツからなる「注釈アンカー」で構成されます。
function handleNewAnnotation(annotationText, anchor) {
  var newAnnotation = new Annotation(annotationText, anchor);
  simpleStorage.storage.annotations.push(newAnnotation);
}
この関数は Annotation オブジェクトのコンストラクタを呼び出すので、コンストラクタも用意する必要があります。
function Annotation(annotationText, anchor) {
  this.annotationText = annotationText;
  this.url = anchor[0];
  this.ancestorId = anchor[1];
  this.anchorText = anchor[2];
}
このコードを注釈エディタにリンクして、ユーザーがエディタでリターンキーを押したときに、新しい注釈が作成されて保存されるようにする必要があります。
var annotationEditor = panels.Panel({
  width: 220,
  height: 220,
  contentURL: data.url('editor/annotation-editor.html'),
  contentScriptFile: data.url('editor/annotation-editor.js'),
  onMessage: function(annotationText) {
    if (annotationText)
      handleNewAnnotation(annotationText, this.annotationAnchor);
    annotationEditor.hide();
  },
  onShow: function() {
    this.postMessage('focus');
  }
});
保存された注釈のリッスン
これが機能することを証明するため、アドオンのコードからそれまでに入力された注釈を表示する部分を実装してみましょう。ウィジェットの right-click メッセージに対応して表示されるパネルとして実装します。
このパネルには、以下の 3 つの新しいファイルが関連付けられています。
- パネルのコンテンツを構築するコンテンツスクリプト
- パネルのコンテンツのテンプレートとして使用される単純な HTML ファイル
- 基本的なスタイルをいくつか提供する単純な CSS ファイル
これら 3 種類のファイルはすべて、data に新しいサブディレクトリ(ここではlist と名付けます)を作成して保存することができます。
注釈リストのコンテンツスクリプト
以下は、注釈リストのコンテンツスクリプトです。
self.on("message", function onMessage(storedAnnotations) {
  var annotationList = $('#annotation-list');
  annotationList.empty();
  storedAnnotations.forEach(
    function(storedAnnotation) {
      var annotationHtml = $('#template .annotation-details').clone();
      annotationHtml.find('.url').text(storedAnnotation.url)
                                 .attr('href', storedAnnotation.url);
      annotationHtml.find('.url').bind('click', function(event) {
        event.stopPropagation();
        event.preventDefault();
        self.postMessage(storedAnnotation.url);
      });
      annotationHtml.find('.selection-text')
                    .text(storedAnnotation.anchorText);
      annotationHtml.find('.annotation-text')
                    .text(storedAnnotation.annotationText);
      annotationList.append(annotationHtml);
    });
});
このコンテンツスクリプトでは、保存された注釈の配列からパネルの DOM を構築します。
ユーザーはパネルでリンクをクリックできますが、ここではパネルではなくメインブラウザウィンドウでリンクを開くことにします。そこでこのコンテンツスクリプトではクリックハンドラをリンクにバインドし、これらのリンクから URL をアドオンに送信します。
このファイルを data/list の中に annotation-list.js という名前で保存します。
注釈リストの HTML および CSS
以下は、注釈リストの HTML です。
<html>
<head>
  <meta http-equiv="Content-type" content="text/html; charset=utf-8" />
  <title>Saved annotations</title>
  <link rel="stylesheet" type="text/css" href="annotation-list.css" />
</head>

<body>

<div id="annotation-list">
</div>

<div id="template">
  <div class="annotation-details">
    <a class="url"></a>
    <div class="selection-text"></div>
    <div class="annotation-text"></div>
  </div>
</div>

</body>

</html>
以下は対応する CSS です。
これらのファイルを data/list の中に、それぞれ annotation-list.html と annotation-list.css という名前で保存します。
main.js の更新
以下は、パネルを作成するためのコードで、main 関数に挿入することができます。
var annotationList = panels.Panel({
  width: 420,
  height: 200,
  contentURL: data.url('list/annotation-list.html'),
  contentScriptFile: [data.url('jquery-1.4.2.min.js'),
                      data.url('list/annotation-list.js')],
  contentScriptWhen: 'ready',
  onShow: function() {
    this.postMessage(simpleStorage.storage.annotations);
  },
  onMessage: function(message) {
    require('tabs').open(message);
  }
});
このパネルのコンテンツスクリプトでは jQuery が使用されているので、jQuery もあわせて渡します。ここでも jQuery の名前が、ダウンロードした jQuery のバージョンと一致することを確認してください。
パネルが表示されたら、保存されている注釈の配列をそのパネルに送信します。パネルから URL が送信された場合は、tabs モジュールを使用して新しいタブでその URL を開きます。
最後に、これをウィジェットの right-click メッセージに接続する必要があります。
var widget = widgets.Widget({
  id: 'toggle-switch',
  label: 'Annotator',
  contentURL: data.url('widget/pencil-off.png'),
  contentScriptWhen: 'ready',
  contentScriptFile: data.url('widget/widget.js')
});

widget.port.on('left-click', function() {
  console.log('activate/deactivate');
  widget.contentURL = toggleActivation() ?
            data.url('widget/pencil-on.png') :
            data.url('widget/pencil-off.png');
});

widget.port.on('right-click', function() {
    console.log('show annotation list');
    annotationList.show();
});
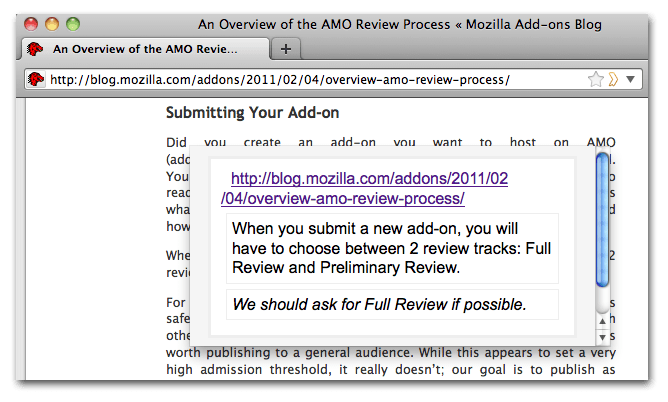
今回は、cfx xpi を実行してアドオンの XPI を作成し、Firefox にインストールします。その後、アドオンをアクティブ化し、注釈を追加し、ウィジェットを右クリックします。以下のような出力が表示されます。
これまでは、XPI を作成してアドオンを Firefox にインストールするよりも、cfx run を実行する方法を常に採ってきました。Firefox を再起動しても注釈が再表示されない場合は、これまでのように単に cfx run を実行するのではなく、アドオンをインストールしたことをもう一度確認してください。
Firefox を再起動し、再度ウィジェットを右クリックし、注釈が表示されていることを確認します。
OverQuota イベントへの対応
アドオンのストレージ空間では、使用できるクオータに上限があります。クオータを超過したままアドオンを終了すると、クオータ超過後に保存されたすべてのデータが失われます。
そのため、simple-storage が発する OverQuota イベントをリッスンしてそれに対応することは重要です。これには、以下のコードをアドオンの main 関数に追加します。
simpleStorage.on("OverQuota", function () {
  notifications.notify({
    title: 'Storage space exceeded',
    text: 'Removing recent annotations'});
  while (simpleStorage.quotaUsage > 1)
    simpleStorage.storage.annotations.pop();
});
このコードでは、通知によってユーザーに警告を与えるので、以下のように notifications モジュールをインポートする必要があります。
var notifications = require("notifications");
(これが問題に対処する方法として、信じられないほど役立たないことは明らかです。実際のアドオンでは、保存するデータをユーザーが選択できるようにするとともに、アドオンがクオータ以下のサイズに戻るまで、データを追加できないようにする必要があります。)
プライベートブラウジングへの配慮
注釈機能はユーザーの閲覧履歴を記録するので、ブラウザがプライベートブラウジングモードの状態で注釈を作成できないようにする必要があります。
まず private-browsing モジュールを main.js にインポートします。
var privateBrowsing = require('private-browsing');
このアドオンではすでに、注釈の入力が可能かどうかを指定する変数として annotatorIsOn を使用していますが、その変数はここでは使用しません。なぜなら、プライベートブラウジングを終了したときに、それまでの状態にかかわらずアノテーターを再び機能させるには、その前提となるアクティブ化の状態を記憶しておく必要があるからです。
そこでここでは、注釈を行うためにはアノテーターが起動され、かつプライベートブラウジングがオフであることを要件として定義する関数を実装します。
function canEnterAnnotations() {
  return (annotatorIsOn && !privateBrowsing.isActive);
}
次に、これまで annotatorIsOn を直接使用していたすべての箇所で、代わりに以下の関数を呼び出します。
function activateSelectors() {
  selectors.forEach(
    function (selector) {
      selector.postMessage(canEnterAnnotations());
  });
}
function toggleActivation() {
  annotatorIsOn = !annotatorIsOn;
  activateSelectors();
  return canEnterAnnotations();
}
var selector = pageMod.PageMod({
  include: ['*'],
  contentScriptWhen: 'ready',
  contentScriptFile: [data.url('jquery-1.4.2.min.js'),
                      data.url('selector.js')],
  onAttach: function(worker) {
    worker.postMessage(canEnterAnnotations());
    selectors.push(worker);
    worker.port.on('show', function(data) {
      annotationEditor.annotationAnchor = data;
      annotationEditor.show();
    });
    worker.on('detach', function () {
      detachWorker(this, selectors);
    });
  }
});
さらに、プライベートブラウジングモードの使用中に、前提となるアクティブ化の状態を変更できないようにするため、toggleActivation をもう一度以下のように編集します。
function toggleActivation() {
  if (privateBrowsing.isActive) {
    return false;
  }
  annotatorIsOn = !annotatorIsOn;
  activateSelectors();
  return canEnterAnnotations();
}
最後に、main 関数の中に以下のコードを追加して、プライベートブラウジングの状態が変更された場合に、アイコンが変更されセレクタに通知されるようにします。
privateBrowsing.on('start', function() {
  widget.contentURL = data.url('widget/pencil-off.png');
  activateSelectors();
});

privateBrowsing.on('stop', function() {
  if (canEnterAnnotations()) {
    widget.contentURL = data.url('widget/pencil-on.png');
    activateSelectors();
  }
});
演習:cfx run を実行し、プライベートブラウジングモードの使用時と非使用時にそれぞれ、アノテーターのオンとオフを切り替えてください。
これで注釈を作成し、保存できるようになりました。次のチュートリアルでは最後の手順として、ユーザーがページを読み込んだときに、保存されている注釈を表示します。