注釈の表示
このセクションでは、page-mod を使用して、Web ページの中で注釈が付けられた要素を検索するとともに、検出した注釈をパネルに表示します。
マッチャー page-mod
マッチャーコンテンツスクリプト
マッチャー page-mod のコンテンツスクリプトは、ユーザーがそれまでに作成したすべての注釈のリストを使用して初期化します。
ページが読み込まれると、マッチャーは DOM から注釈に一致する要素を検索します。要素が検出された場合、マッチャーはその要素の mouseenter および mouseleave イベントに関数をバインドすることでメッセージを main モジュールに送信し、その注釈の表示または非表示を指示します。
マッチャーはセレクタと同様、ウィンドウの unload イベントをリッスンし、アンロード時に detach メッセージを main モジュールに送信します。これにより、アドオンはクリーンアップが可能になります。
完全なコンテンツスクリプトを以下に示します。
self.on('message', function onMessage(annotations) {
annotations.forEach(
function(annotation) {
if(annotation.url == document.location.toString()) {
createAnchor(annotation);
}
});
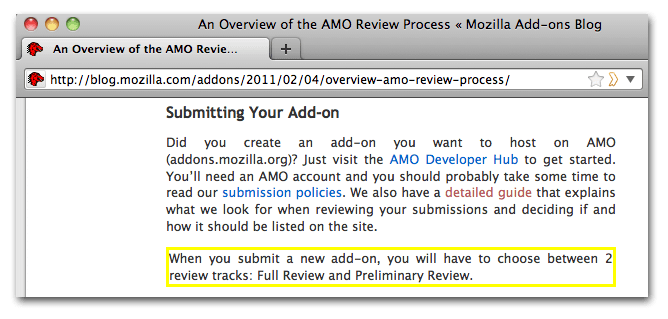
$('.annotated').css('border', 'solid 3px yellow');
$('.annotated').bind('mouseenter', function(event) {
self.port.emit('show', $(this).attr('annotation'));
event.stopPropagation();
event.preventDefault();
});
$('.annotated').bind('mouseleave', function() {
self.port.emit('hide');
});
});
function createAnchor(annotation) {
annotationAnchorAncestor = $('#' + annotation.ancestorId);
annotationAnchor = $(annotationAnchorAncestor).parent().find(
':contains(' + annotation.anchorText + ')').last();
$(annotationAnchor).addClass('annotated');
$(annotationAnchor).attr('annotation', annotation.annotationText);
}
これを data の中に matcher.js という名前で保存します。
main.js の更新
まず、マッチャーコンテンツスクリプトに関連付けられるワーカーを保持する配列を初期化します。
var matchers = [];
main 関数で、マッチャーを作成する以下のコードを追加します。
var matcher = pageMod.PageMod({
  include: ['*'],
  contentScriptWhen: 'ready',
  contentScriptFile: [data.url('jquery-1.4.2.min.js'),
                      data.url('matcher.js')],
  onAttach: function(worker) {
    if(simpleStorage.storage.annotations) {
      worker.postMessage(simpleStorage.storage.annotations);
    }
    worker.port.on('show', function(data) {
      annotation.content = data;
      annotation.show();
    });
    worker.port.on('hide', function() {
      annotation.content = null;
      annotation.hide();
    });
    worker.on('detach', function () {
      detachWorker(this, matchers);
    });
    matchers.push(worker);
  }
});
新しいページを読み込むと、onAttach に割り当てられている関数が呼び出されます。この関数は以下の処理を行います。
- 現在の注釈セットを使用して、コンテンツスクリプトのインスタンスを初期化します。
- そのコンテンツスクリプトからメッセージを受信するためのハンドラをバインドし、送信されてくる
show、hide、detachの 3 種類のメッセージを処理します。 - 後からメッセージを返せるように、ワーカーを配列に追加します。
次にこのモジュールのスコープ内で、マッチャーワーカーを更新する関数を実装し、ユーザーが新しい注釈を入力したときにこの新しい関数が呼び出されるように handleNewAnnotation を編集します。
function updateMatchers() {
  matchers.forEach(function (matcher) {
    matcher.postMessage(simpleStorage.storage.annotations);
  });
}
function handleNewAnnotation(annotationText, anchor) {
  var newAnnotation = new Annotation(annotationText, anchor);
  simpleStorage.storage.annotations.push(newAnnotation);
  updateMatchers();
}
注釈パネル
注釈パネルは、注釈のコンテンツのみを表示します。
注釈パネルには、次の 2 つのファイルが関連付けられています。
- テンプレートとして使用される単純な HTML ファイル
- パネルのコンテンツを構築する単純なコンテンツスクリプト
これらのファイルはすべて、data の新しいサブディレクトリ(ここでは annotation と名付けます)に保存します。
注釈パネル HTML
これを data/annotation の中に annotation.html という名前で保存します。
注釈パネルのコンテンツスクリプト
注釈パネルには、テキストを設定する最小限のコンテンツスクリプトが存在します。
 self.on('message', function(message) {
  $('#annotation').text(message);
});
これを data/annotation の中に annotation.js という名前で保存します。
main.js の更新
最後に、注釈パネルを作成するコードを使用して main.js を更新します。
var annotation = panels.Panel({
  width: 200,
  height: 180,
  contentURL: data.url('annotation/annotation.html'),
  contentScriptFile: [data.url('jquery-1.4.2.min.js'),
                      data.url('annotation/annotation.js')],
  onShow: function() {
    this.postMessage(this.content);
  }
});
最後に cfx run を 1 回実行します。アノテーターを起動し、注釈を入力します。注釈を付けたアイテムの周りに、以下のように黄色の枠が表示されます。
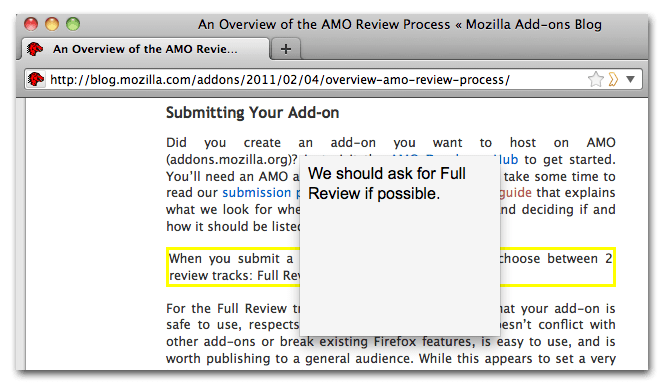
そのアイテムにマウスを合わせると、注釈が表示されます。
もちろんこのアドオンは、まだ完成から程遠い状態です。書式は改善の余地があり、注釈を削除する仕組みも必要です。信頼性の高い OverQuota 処理が必要であり、マッチャーによる一致処理の信頼性をさらに高める方法はいくつも考えられます。
しかし、この addon-kit パッケージの各モジュールが持つ可能性を把握する上で、このチュートリアルが一助となれば幸いです。